
What Is AutoText and How Do I Use It?
What is AutoText?
AutoText is a way to store parts of a Word document for re-use. You can, for example, create a library of boilerplate paragraphs for business letters, or keep a handy selection of headers and footers. An AutoText entry can store anything a Word document can contain, such as formatted text, pictures, and fields.
The AutoText feature changed in many ways in Word 2007. Those differences are so extensive that a separate section of this article describes it.
AutoText in Word 2003 and Earlier
Word comes with a number of predefined AutoText entries, and you can add as many as you like.
How do I insert an AutoText entry?
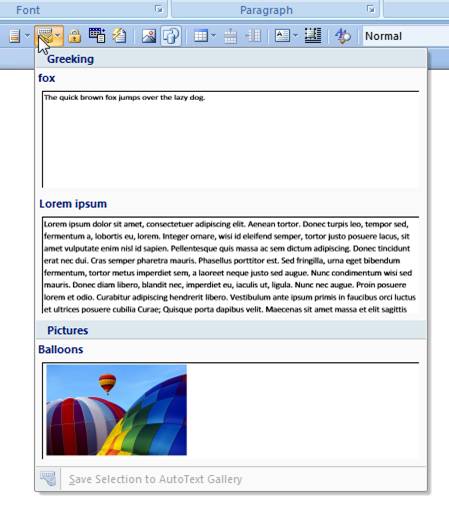
You can quickly insert any entry from the dropdown list on the AutoText toolbar, from the menu Insert>AutoText, from the AutoText button on the Header and Footer toolbar, or from the dialog box Insert>AutoText>AutoText. If you want to see what the entries contain, use the dialog box.

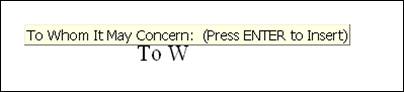
You can also insert an AutoText entry by typing its name in the document, then pressing F3 (on a Macintosh, Command-Option-v). If the AutoComplete feature is activated (by a check box in the AutoText dialog), then you'll see a tool tip above the insertion point when you type enough letters of the entry’s name so that Word can recognize it; pressing Tab or Enter will insert the entry.
In the Insert>AutoText menu lists, you'll notice that the entries are separated into categories. Each category corresponds to the paragraph style with which the text was formatted when it was made into an AutoText entry.
If the insertion point is in a
paragraph of
How do I create a new AutoText entry?
1. Type or insert the material you want to include in the new entry. It can be text—from as little as one character to many pages—or a table, a graphic, fields, text boxes, or any combination of these items.
2. Assign a paragraph style to the material. The name of the style will become the category in the AutoText menu that contains the new entry.
3. Select all the text or other material to be included in the entry (pay special attention to the paragraph mark at the end of the selection—you may or may not want to include it).
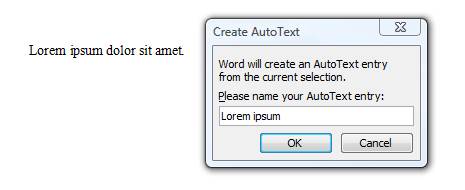
4. If you want the new entry to be available in all your documents, use Insert>AutoText>New or press Alt+F3.
5. If you want it to be available only in documents based on the same template as the current document, use the Insert>AutoText>AutoText dialog and change the “Look in” box to the desired template.
6. Type in a name for the entry. If you want to use the AutoComplete feature, the name has to be at least four characters long. The name can’t be more than 32 characters long.
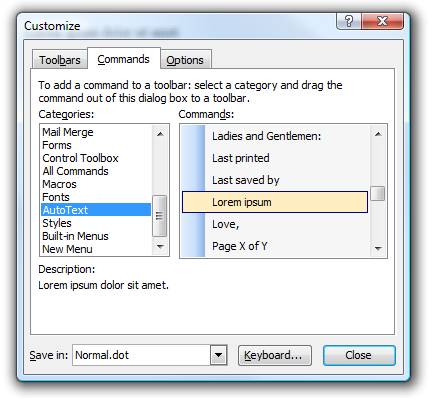
It's possible to assign AutoText entries to menus, toolbar buttons, and keyboard shortcuts—no macro is required! To assign an AutoText entry to a menu or toolbar,
1. Click Tools>Customize>Commands.
2. Select AutoText in the list on the left.
3. Click and drag the AutoText entry to the menu or toolbar of your choice.
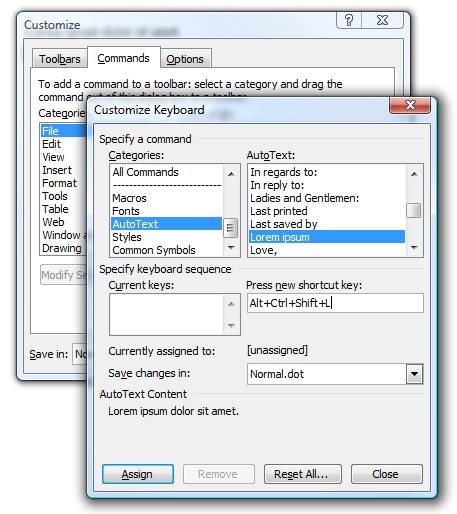
To assign an AutoText entry to a keyboard shortcut,
1. Click Tools>Customize>Keyboard.
2. Select AutoText in the list on the left.
3. Select the name of the entry in the list on the right.
4. Click in the “Press new shortcut key” text box.
5. Press the key combination you want.
6. Click the Assign button.
Where are AutoText entries saved?
AutoText entries are saved in Word templates (*.dot files); they cannot be saved in regular documents (*.doc files). If you don’t specify a different location in the “Look in” box of the dialog when creating an entry, it will be saved in the default global template, Normal.dot.
Because AutoText entries are stored in templates, additions and changes to them aren't automatically saved when you save the document you're working on. To make sure they are saved, hold the Shift key while you click the File menu, and select the Save All command to save both the document and the template. If you forget this step, you should be given a chance to save the template when you close Word—but you shouldn't rely on this.
You can copy AutoText entries between templates with the Organizer (Tools>Templates and Add-Ins>Organizer>AutoText).
AutoText in Word 2007
In Word 2007 the AutoText feature was renamed and is now called Building Blocks. The feature is basically the same as AutoText in previous versions, but in Word 2007 the Building Blocks have additional functionality.
How do I insert a Building Block entry?
The methods available in Word 2003 for inserting AutoText entries—the Insert>AutoText>AutoText dialog, the Header and Footer toolbar, and the AutoComplete tip—are not available in Word 2007, but typing the name of a Building Block and pressing the F3 key still works as before.
Building Blocks can also be inserted by using Building Block galleries found on various tabs in the ribbon:
-
Insert tab: Cover Page, Table>Quick Tables, Header, Footer, Page Number, Text Box, Quick Parts, and Equation
-
Page Layout: Watermark
-
References: Table of Contents and Bibliography
-
Contextual Header & Footer Tools Design tab: Header, Footer, and Page Number
The Cover Page, Bibliography, Footer, and Watermark galleries are shown below.
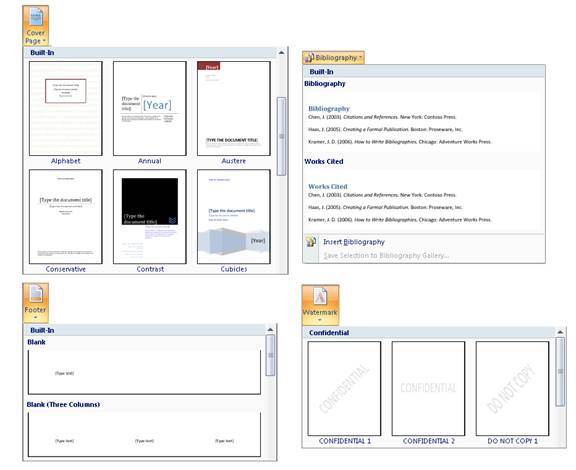
To insert a Building Block, simply click desired thumbnail from the gallery. The majority of the galleries will insert the Building Block at the insertion point, but some of the galleries will insert it at a specific location. For example,
-
Building Blocks in the Header, Footer, and Page Number galleries will be inserted in the current header/footer (if you select from the Top of the Page, Bottom of the Page, or Page Margins galleries) and leave the cursor in the header/footer for additional editing.
-
Building Blocks in the Watermark gallery will also be inserted in the header/footer; if you previously inserted a Watermark from the gallery, the newly inserted watermark will replace the old one.
-
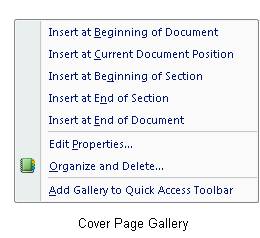
When you insert a Building Block from the Cover Page gallery, it will be inserted at the beginning of the document and will replace any existing Cover Page.
If you want to insert the Building Block in another location instead of replacing the current cover page—for example, if you want to add a second cover page such as a Fax cover page—you can right-click the thumbnail in the gallery to obtain a list of additional actions. The actions provided depend on the gallery you are using. For example, if you right-click a thumbnail in the Cover Page gallery, the following menu of actions will be displayed.
How do I create a new Building Block?
1. Type or insert the material you want to include in the new entry. It can be text—from as little as one character to many pages—or a table, a graphic, fields, text boxes, or any combination of these items.
2. Select all the text or other material to be included in the entry (pay special attention to the paragraph mark at the end of the selection—you may or may not want to include it).
3. Press Alt+F3 to open the Create New Building Block dialog, shown below. Alternatively, you can click the Save Selection to <name> Gallery item at the bottom of almost any gallery.
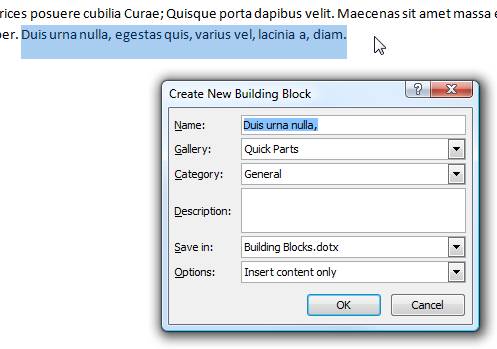
4. The dialog will suggest a name for your entry from the beginning of the selection but you can change the name. The name must be unique within the gallery you are using.
5. Change the Gallery drop down to the gallery of your choice. (If you select AutoText or a Custom gallery, see Adding a Custom or AutoText gallery button to the Quick Access Toolbar .)
6. Choose one of the existing categories, or click Create New Category and create a new one. (The entries in the galleries are sorted and grouped by category.)
7. (Optional) Add a Description. It will be shown in a ScreenTip when you hover your mouse over the thumbnail in the gallery.
8. You can leave the setting to save the entry in Building Blocks.dotx or change it to save in any open template. Building Blocks can only be saved in templates and cannot be saved in regular documents.
9. (Optional) The Options drop down enables you specify where the Building Block is to be inserted, such as in its own paragraph or in its own page.
Assign a Building Block to a keyboard shortcut
Another method for inserting Building Blocks is to create your own keyboard shortcut.
1. Click Office Button>Word Options>Customize, and next to "Keyboard Shortcuts" at the bottom left, click the Customize button.
2. Select AutoText in the list on the left. Building Blocks in all galleries will be displayed.
3. Select the name of the entry in the list on the right.
4. Click in the "Press new shortcut key" text box.
5. Press the key combination you want.
6. Click the Assign button.
Building Blocks Organizer
To see all of the available Building Blocks, click Insert>Quick Parts>Building Blocks Organizer.

In the Building Blocks Organizer dialog, you can click the column headings to sort the entries. For example, if you click the Gallery column heading the Building Blocks will be grouped by gallery and sorted alphabetically within each group. Clicking an entry places a preview in the box to the right, although text will usually be too small to read.

If you created AutoText entries in a previous version of Word, you'll find them stored as Building Blocks in a gallery called AutoText. For more on using Building Blocks in the AutoText gallery see Adding a Custom or AutoText gallery button to the Quick Access Toolbar .
Clicking the Insert button inserts the text of the selected entry into the document at the cursor position.
To edit an entry, select it in the list and then click the Edit Properties button. The Modify Building Blocks dialog box is similar to the Create New Building Block dialog box, and you can change any of the previously assigned properties. This dialog box can also be used to move a Building Block from one to template to another by changing the “Save in” box. This will move the entry, not copy it.
Tip: To quickly locate a Building Block in the Organizer when viewing a gallery, right-click the Building Block thumbnail and then click Organize and Delete.
The Building Blocks Organizer lacks some capabilities that were provided for AutoText entries by the Organizer dialog in previous versions. The biggest shortcoming is the inability to copy Building Blocks between templates and work with groups of Building Blocks. However, Word MVP Greg Maxey has created an add-in with a comprehensive set of tools for dealing with Building Blocks, including an improved Organizer. It is available at Word 2007 Building Blocks & AutoText.
Adding a Custom or AutoText gallery button to the Quick Access Toolbar
If you add Building Blocks to a custom gallery or the AutoText gallery, you can add a button to the Quick Access Toolbar to display them for quick insertion.
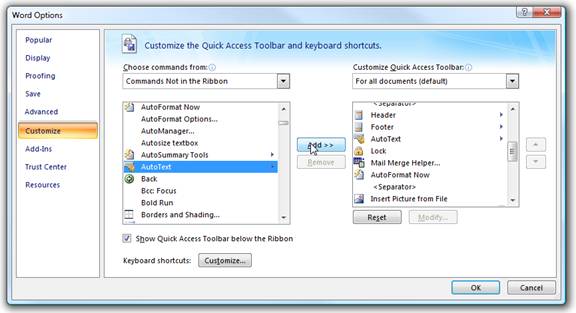
1. Right-click the Quick Access Toolbar and choose Customize Quick Access Toolbar.
2. In the Choose commands from list, select Commands Not in the Ribbon.
-
For a Custom gallery, select Custom <name> in the list, such as Custom Gallery 1.
-
For the AutoText gallery, select AutoText in the list. (Note that Custom AutoText is another available gallery and is not the same as the AutoText gallery.)
(Optional) Select the gallery button in the right-hand list, and use the up and down buttons to the right of the list to move it to another position.
After you add the button to your Quick Access Toolbar, it will display a gallery similar to the one shown below.
If you need to create and manage a large set of Building Blocks, check out Word MVP Greg Maxey’s add-in at Build & Deploy Custom Building Block Gallery.
Adding a Building Block Content Control to a document
If you’re creating a template, such as a form, in which one of several Building Blocks should be inserted at a specific location, you can use one of Word's new Content Controls to display a select group of Building Blocks. In Word 2003 and earlier the only tool to do this is an AutoTextList field, but a Building Block Gallery Content Control offers a preview of each entry like the galleries in the ribbon.
The new Content Controls can be found on the Developer tab. If you don't see this tab in the ribbon, go to the Word Options dialog and in the Popular section select Show Developer tab in the ribbon.
To add a Building Block Content Control follow these steps:
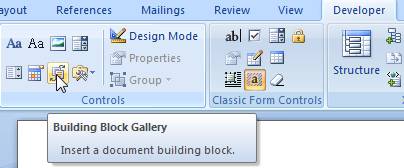
1. On the Developer tab, in the Controls group, click the Building Block Gallery button.
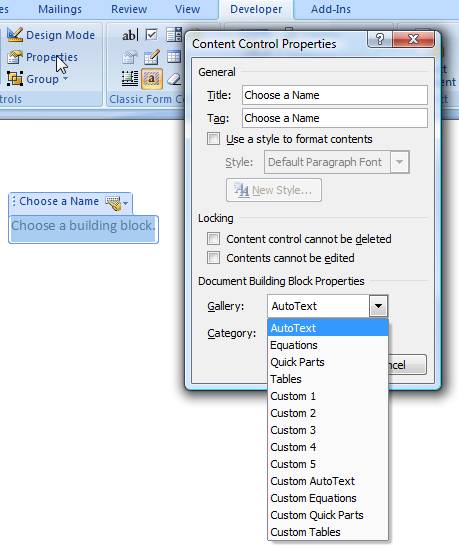
2. Make sure the newly inserted Content Control is selected. In the Controls group, click the Properties button.
3. Type the Title for the Content Control. (The title is displayed when the Content Control is selected in the document.)
4. (Optional) Add a Tag for the Content Control. The Tag is displayed in the document when you’re working in Design Mode, and it can be used by developers to store additional information about the Content Control for programmatic access.
5. Select a Gallery, such as the AutoText gallery, from the Gallery drop down.
6. (Optional) To display a specific category of Building Blocks from a gallery, from the Category drop down select the desired Category. If you don’t select a Category, all categories in the gallery will display.
(Optional) After you have modified the Properties you can change the prompt text, such as "Choose a building block", by clicking the Design Mode button in the Controls group and modifying the text between the Tag markers. Make sure you click the Design Mode button again when you are finished to turn off design mode.
What’s the difference between Building Blocks/AutoText and AutoCorrect?
The obvious difference between Building Blocks/AutoText and AutoCorrect is how they are triggered. AutoCorrect takes effect as soon as you type text that Word recognizes, followed by a space or punctuation. In contrast, Building Blocks/AutoText requires you to press F3 or accept the AutoComplete prompt (in Word versions prior to 2007); if you don’t specifically enable the replacement, nothing happens. If you want complete control and don’t like things happening “automagically,” you may prefer Building Blocks/AutoText.
Another difference is that unformatted (“Plain text”) AutoCorrect entries are available in all Office programs, but Building Blocks/AutoText entries and formatted AutoCorrect entries are available only when you’re working in Word.
Tips
-
Building Blocks/AutoText names have a maximum length of 32 characters and may include spaces. The number of entries and the length of their contents are limited only by the template file size and available memory.
-
To print a list of the Building Blocks/AutoText entries, click File>Print (or Office Button/Print in Word 2007) and set the drop down list Print what to AutoText entries (or Building Blocks entries for Word 2007), then click OK.
-
If you want a picture, logo, or other item to be printed on every envelope, including envelopes generated by a mail merge, create a Building Block/AutoText entry and give it the special name EnvelopeExtra1 (you can assign it to any gallery in Word 2007). Detailed instructions are available at Modifying the appearance of your envelopes.
-
Building Blocks/AutoText entries are a great way to store specially formatted blank tables, as described in Is there a way to add custom table formats to the Table Autoformat list? They’re also useful for complicated fields, groups of symbol characters, chemical formulas, or anything else that’s time-consuming to construct and will be used more than once.
See also: Create or edit AutoText via VBA