
How to put a portrait page number on a landscape page
Article contributed by Bill Coan, Suzanne S. Barnhill and Dave Rado
Many long documents, such as academic papers and business reports and proposals, contain tables or figures that will fit on the page only if it’s turned sideways (broadside). But graduate school requirements or a simple desire for consistency throughout may call for all pages to have a page number or to have the same header and/or footer as the rest of the document. So the question arises: How do I get my tables printed in landscape orientation and still have a portrait page number?
The solution to this problem depends on the version of Word you have and, to some extent, how much trouble you’re willing to go to (and what you consider trouble) and whether you need to keep the entire document in a single file. Step-by-step instructions are provided below for later versions of Word, as well as instructions that will work in any version. We begin with instructions for inserting a landscape section. (If you’ve already inserted a landscape section, skip down to “How to put a portrait header or footer on a landscape page.”)
For some important “gotchas” and how to get round them, see: “Working with sections.”
How to insert a landscape page into a portrait document
The following steps describe all the steps needed to perform this task. For a shortcut, see below.
- Display nonprinting characters:
- In Word 2003 and earlier, on the Standard toolbar click the Show/Hide ¶ button (¶).
- In Word 2007, on the Home tab of the Ribbon locate the Paragraph group and click the Show/Hide ¶ button (¶).
- Switch to Normal or Draft view:
- In Word 2003 and earlier, choose View | Normal or on the horizontal scroll bar click the Normal View button.
- In Word 2007, choose View | Document Views | Draft or on the status bar click the Draft button.
- Position the cursor where you want the landscape page to start.
- Insert a Next Page section break:
- In Word 2003 or earlier, choose Insert | Break | Next Page and click OK.
- In Word 2007, choose Page Layout | Breaks | Section Breaks: Next Page.
- Press Enter to create a new paragraph.
- Insert another Next Page section break (step 4). If your document does not have headers, footers, or page numbers, skip to step 11.
- Without moving the cursor, access the page header:
- In Word 2003 or earlier, choose View | Header and Footer.
- In Word 2007, switch to Print Layout view and then double-click in the header area.
- Disable “Different first page”:
- In Word 2003 and earlier, on the Header and Footer toolbar, click Page Setup. On the Layout tab, clear the check box for “Different first page” (if it is checked), then click OK.
- In Word 2007, on the Header & Footer Tools Design tab of the Ribbon locate the Options group and then clear the check box for “Different First Page” (if it is checked).
- Unlink this header/footer section from the previous
one:
- In Word 2003 and earlier, on the Header and
Footer toolbar, click Same as Previous (Link to Previous in recent
versions) so that the button appears off (not depressed).

- If your page number is in the footer, click Switch Between Header and Footer, and then turn off Same as Previous there as well.
- In Word 2007, on the Header & Footer Tools Design tab of the Ribbon locate the Navigation group and click Link to Previous so that the button appears off (dimmed). If your page number is in the footer, click Go to Footer and turn off Link to Previous there as well.
- In Word 2003 and earlier, on the Header and
Footer toolbar, click Same as Previous (Link to Previous in recent
versions) so that the button appears off (not depressed).
- Return to the main body of the document:
- In Word 2003 and earlier, on the Header and Footer toolbar click Close.
- In Word 2007, double-click in the document area or on the Header & Footer Tools Design tab of the ribbon click Close Header and Footer.
- Position the cursor between the two section breaks entered in Steps 4–6. In Word 2007, if you have performed steps 7–10, you can switch back to Draft view temporarily to be sure you are on the right page, or you can use the Previous Section button.
- Access the page header as described in step 7.
- Disable “Different first page” as described in step 8.
- Change the page orientation:
- In Word 2003 and earlier, in the Page Setup dialog (accessed in step 13), switch to the Paper Size tab (Word 2000 and earlier) or Margins tab (Word 2002 or 2003). Making sure that “This section” is showing in the “Apply to” box, select “Landscape” as the orientation and click OK.
- In Word 2007, on the Page Layout tab of the Ribbon locate the Page Setup group and click Orientation and choose Landscape. (If you prefer, you can access the Page Setup dialog using the dialog launcher in the bottom right corner of the group and choose the orientation in that dialog as described above for Word 2003; this will allow you to verify that “This section” is selected for “Apply to,” but that setting is the default for the Orientation button.)
- Unlink the header and footer in this section from the previous one as described in step 9.
- Place desired content on the landscape page.
- You have now successfully inserted a landscape section and unlinked its header (and footer, if required) from those in the portrait sections preceding and following. If you are content to have a landscape header or footer, you can edit the existing header/footer to match the width of the landscape page. If you need a portrait header/footer, read on.
A shortcut method
If you have already inserted the content you want to be in landscape orientation, select all of it, go to the Page Setup dialog (using File | Page Setup in Word 2003 and earlier and, in Word 2007, using the dialog launcher in the Page Layout | Page Setup group), and select Landscape orientation for “Selected text.” Word will take care of inserting the necessary section breaks. If you have headers/footers, you will still need to go through the steps required to unlink them from surrounding sections.
Even if you haven't already inserted the content you want to be in landscape orientation (and it's usually best not to insert the content until you have made the page landscape, because pictures and other objects scale to fit the page margins when pasted), you can still use this shortcut. Create a blank paragraph by pressing Enter; select the paragraph mark, and then go to Page Setup and select Landscape orientation for “Selected text,” thus allowing Word to insert the section breaks for you, before unlinking the headers and footers of both the landscape section and the following section. This is the best and easiest method to use if you are a seasoned Word user, but the steps outlined above are probably better if you're not.
If it's a business document, (especially business documents that may be read on screen) you may now want to adjust the header and footer of the landscape section so that they fit the width of the page. The best way of doing that is to create specific styles for the purpose and apply them whenever you create a landscape section. Once that is done, you have finished.
For academic papers, books, and some other types of document, however, you will want a portrait header and footer in your landscape section; if you do, read on.
How to put a portrait header or footer on a landscape page
There are several alternative methods of putting a portrait page number, header, or footer on a landscape page. There is only one method that is comparatively easy (using “dummy pages”), and it is frequently not satisfactory. The other methods are all quite involved and require a fair amount of trial and error, but the instructions below will give you a good start.
If all you need is a page number, Word 2007 has made this much easier (though not exactly obvious), so let’s start there.
Portrait page number in Word 2007
Word 2007 essentially automates the creation of a text box as described below. Here’s how:
- Double-click in the header area to display the Header & Footer Tools Design tab of the Ribbon.
- In the Header & Footer group, click Page Number, then Page Margins.
Note: This group and button are also accessible from the Insert tab without accessing the header.
- In the gallery, choose one of the Page X or Plain Number selections. The “vertical” ones look tempting but in fact are rotated the wrong direction, so you’re probably better off with the Plain Number. If you want numbers at the top of the page, choose Right, or Left for numbers at the bottom.
- You’ll probably need to reformat whichever number you choose, removing a border or reducing the font size.
- Since the number is in a text box, the Text Box Tools tab is available when you select the number. In the Text group, use the Text Direction button to rotate the number to the correct orientation.
- You may need to fine-tune the size and placement of the text box. You can try to drag it where you want it, or you can use Arrange | Position | More Layout Options to specify the location precisely.
Note: Since the page number is in an ordinary text box, you can actually make the text box large enough to contain a header or footer if desired. Or you can follow the directions below for doing the entire task manually.
Using “dummy pages” and two print runs (all Word versions)
If your document is not likely ever to need to be emailed to others, but will only be distributed in hard copy, this is probably the simplest method of printing landscape pages with a portrait header/footer, and it works in any version of Word.
- In your document, insert manual page breaks (Ctrl+Enter) to create the required number of pages for your landscape section. These “blank” pages will have the same header and/or footer as the text pages.
- In a separate document, or in a separate landscape section at the end of the document, set up your landscape pages with the appropriate margins and no header or footer.
- Print the portrait document (or portrait portion of the combined portrait/landscape document).
- Load the “blank” pages back into your printer, being careful to orient the pages in such a way that the landscape pages will print correctly, and print the landscape section or document.
Using a text box (Word 97 and above)
This is simpler to set up than using a table in a frame; but unfortunately, certain fields do not work in text boxes—most problematically, the StyleRef field doesn’t. If you want to use a StyleRef (or any sort of cross-reference) field, then you will need to use a table in a frame rather than a text box.
Also, if you need part of the header or footer to word-wrap, (for example, if you have a title on the left, which may need to word-wrap, and a page number on the right), then you will need a table; and tables in frames are much easier to manage than tables in text boxes.
Here is the procedure for using a text box:
- Review steps 7–15 in the section on “Inserting a landscape page” as needed for instructions on unlinking the header and footer of the landscape section from the portrait sections preceding and following. It is very important that you do this before proceeding any further.
- Delete the material in the header or footer of your landscape section; or cut it to the Clipboard for reuse in Step 7.
- With the cursor positioned in the empty header, draw
a text box:
- In Word 2003 and earlier, use the Text Box tool
on the Drawing toolbar:
 (or select Insert | Text Box).
 - In Word 2007, use Insert | Text | Text Box | Draw Text Box.
- In Word 2003 and earlier, use the Text Box tool
on the Drawing toolbar:
- Size and position the text box as desired. You can put the text box anywhere on the page and it will still be treated as part of the header or footer. For a header, you want the text box to be in the right margin of the page; for a footer, it should be in the left margin.
- Remove the border from the text box, if desired, by right-clicking its border and choosing Format Text Box (Format AutoShape in Word 2007) and then choosing “Line Color”: “No Line” on the Colors and Lines tab. (In Word 2007, when a text box is selected, the Text Box Tools tab provides a button for Shape Outline.)
- With the cursor in the text box, choose Format | Text Direction (or use the Text Direction button on the Text Box toolbar or, in Word 2007, the Text Box Tools tab), choose the desired text direction, and click OK.
- Enter the desired text in the text box, using the buttons on the Header and Footer toolbar or Header & Footer Tools Design tab if needed. Or paste the contents of the Clipboard into the text box (see Step 2). Set up your tabs, if needed, by using the built-in Header and Footer styles (use the Tabs dialog if you need to adjust them; you can't use the ruler, obviously).
- Repeat Steps 2–7 (if needed) for the footer.
- Return to the main document by clicking Close or Close Header and Footer or by double-clicking in the document body.
Note: When using this method, it is very important to have both header and footer unlinked from both preceding and following sections. Depending on the placement of your text box, Word may spontaneously decide to anchor it to the header instead of the footer (where you created it) or vice versa; if the header or footer isn’t unlinked from those of the surrounding sections, the text box will appear throughout the document.
Using a table in a frame (Word 97–2003)
Note: Although frames can still (with considerable difficulty) be accessed in Word 2007, that version also removes most of the limitations of text boxes, so use of frames in Word 2007 is not recommended.
- Review steps 7–15 in the section on “Inserting a landscape page” as needed for instructions on unlinking the header and footer of the landscape section from the portrait sections preceding and following. It is very important that you do this before proceeding any further.
- Delete the material in the header or footer; or cut it to the Clipboard for reuse in Step 11.
- With the cursor positioned in the empty header, insert a one-row, one-column table using the Insert Table button on the Standard toolbar (or use Insert | Table). Let it be the default size. Remove the border.
- Select the table. Set the column width to, say, half an inch (1.27 cm), and decrease the space between columns to 0 (in Word 2000 and above, you have to go to Table | Properties | Options, and set both the “Left” and “Right” measurements to 0).
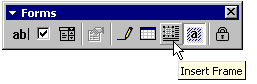
- With the table still selected, insert a frame using the Insert Frame button on the Forms toolbar.
- Drag the frame into the left margin (for the footer) or the right margin (for the header), and position it so that the top of the frame lines up exactly with the top margin of the page. You can get much better control by holding the Alt key down while you drag.
Alternatively, you can select Format | Frame, or right-click on the frame border and select Format Frame. Set the Horizontal position to say 0.5" (1.27 cm) relative to Page, for the footer, or around 10.5" (27 cm) for the header. (If the Horizontal position box says “Left”, you will need to overtype the word with the measurement you want). Set the Vertical position to be exactly equal to the top margin of the page (by default, 1", or 2.54 cm). Using drag and drop is probably easier, though.
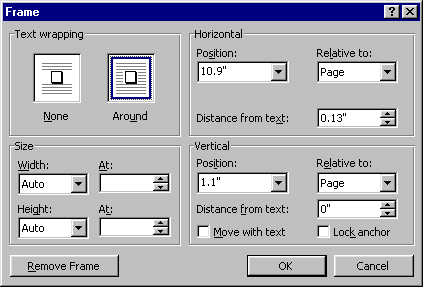
The Frame dialog looks a bit different in more recent versions of Word but has the same controls.
- Select the table; and, holding the Alt key down, drag the bottom of the table down so that it lines up exactly with the bottom margin of the page. Alternatively, format the cell height to Exactly the distance between your top and bottom page margins.
- If you need additional cells (because your header or footer is normally in a table, so that you can have word wrap), click in the table and select Table | Split Cells; choose 1 column and either 2 or 3 rows, as appropriate (this maintains your row height, whereas inserting rows does not).Then fine-tune the relative heights (pseudo “widths”) of the rows by dragging the cell borders.
- Change the text direction (Format | Text Direction).
- Apply styles as appropriate. If one cell, use the built-in Header or Footer styles (which will automatically give you any tab stops you need). If two or three cells, use the styles that you use in your “ordinary” headers.
- Enter the desired text in the table, using the buttons on the Header and Footer toolbar if needed. Or paste the contents of the Clipboard into the table (see Step 2). Set up your tabs, if needed, by using the built-in Header and Footer styles (select Format | Tabs if you need to adjust them; you can't use the ruler, obviously).
Note: In some recent versions of Word, text in frames can be rotated (using Format | Text Direction) without the need for inserting a table. You will still need a table, however, if you would ordinarily have used one to lay out your header or footer.
Using a table with Text Wrapping (Word 2000 and above)
A text-wrapped table in Word 2000 and above is actually a table in an invisible frame. So you can use the same steps as those described for using a table in a frame, except that instead of inserting a frame, you can go to Table | Properties | Table, and set the “Text Wrapping” to “Around.” Then click on the “Positioning” button, (instead of using Format | Frame) to set the horizontal and vertical positions relative to the page.
The advantage of this method is that it's slightly easier to set up. The disadvantage is that, because the frame is invisible, it's much less obvious what's going on, and if other people ever have to maintain your document in the future, they are therefore more likely to run into problems. So, on balance, we would normally recommend using visible frames rather than text wrapped tables.
Note: In Word 2007, it does not seem to be possible to drag a wrapped table anchored to the header to any position outside the header area, though it can be placed in the left or right margin using Table Properties | Table | Positioning.
For an alternative viewpoint on this subject, see the Microsoft Knowledge Base article “WD97: How to Add a Portrait Page Number to a Landscape Page.” [Lene Fredborg, 18-Jun-2018: Removed outdated link to http://support.microsoft.com/?kbid=162235](There is a Word 2000 equivalent of that article, but it's pretty much identical).